
Administration Fund instructions
On this page
The following instructions will show how to prepare and submit claims for the Administration Fund. To see how to start a claim, go to the ‘Start a new Public funding claim’ instructions.
Preparing and submitting an advance claim for the Administration Fund
Overview page
After starting an advance claim, you will see the ‘Overview’ page at the beginning of your claim form.
1. Read the information about the claim form on the overview page – including what the claim form is for, who can edit and submit the form, and information about the claim for payment. Note: there is different information for political parties and elected members.
2. To open and read detailed information about what to do for each step, click the arrows next to the next steps. You can also click ‘Expand all’ to open all the steps at once and ‘Collapse all’ to close all the steps at once.
3. Click ‘Save and continue’ to save your progress and go to the next page: Claim details.
- Note: after starting a claim form, if you click the ‘Leave form’ button, your progress will not be saved. If you click ‘Delete’, the claim form will be deleted and reappear under the ‘Start a new claim’ action list.
- Note: if you leave the claim form at any stage, you can access the claim form again via ‘My action list’ on the home page.
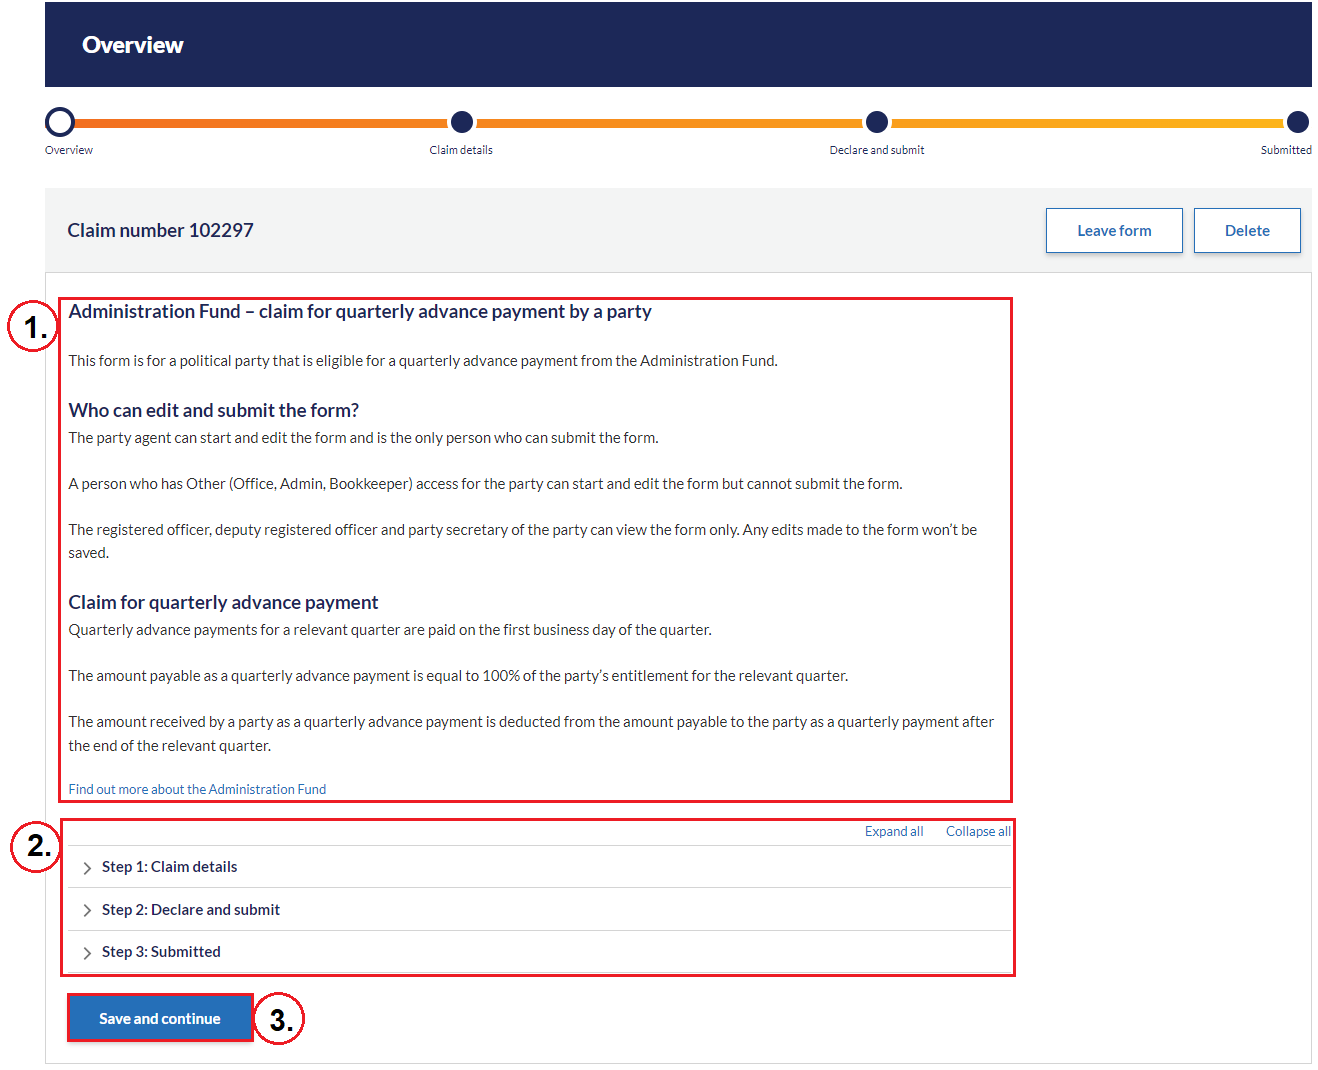
Figure 1: Overview page for the Administration Fund advance claim form
Claim details page
4. Ensure the details in the pre-populated fields are correct.
5. Click ‘Save and continue’ to save your progress and go to the next page: Declare and submit.
- Note: to leave the form but save your changes, click ‘Save and exit’. You can also click ‘Leave form’ to discard changes, and ‘Delete’ to delete the form.
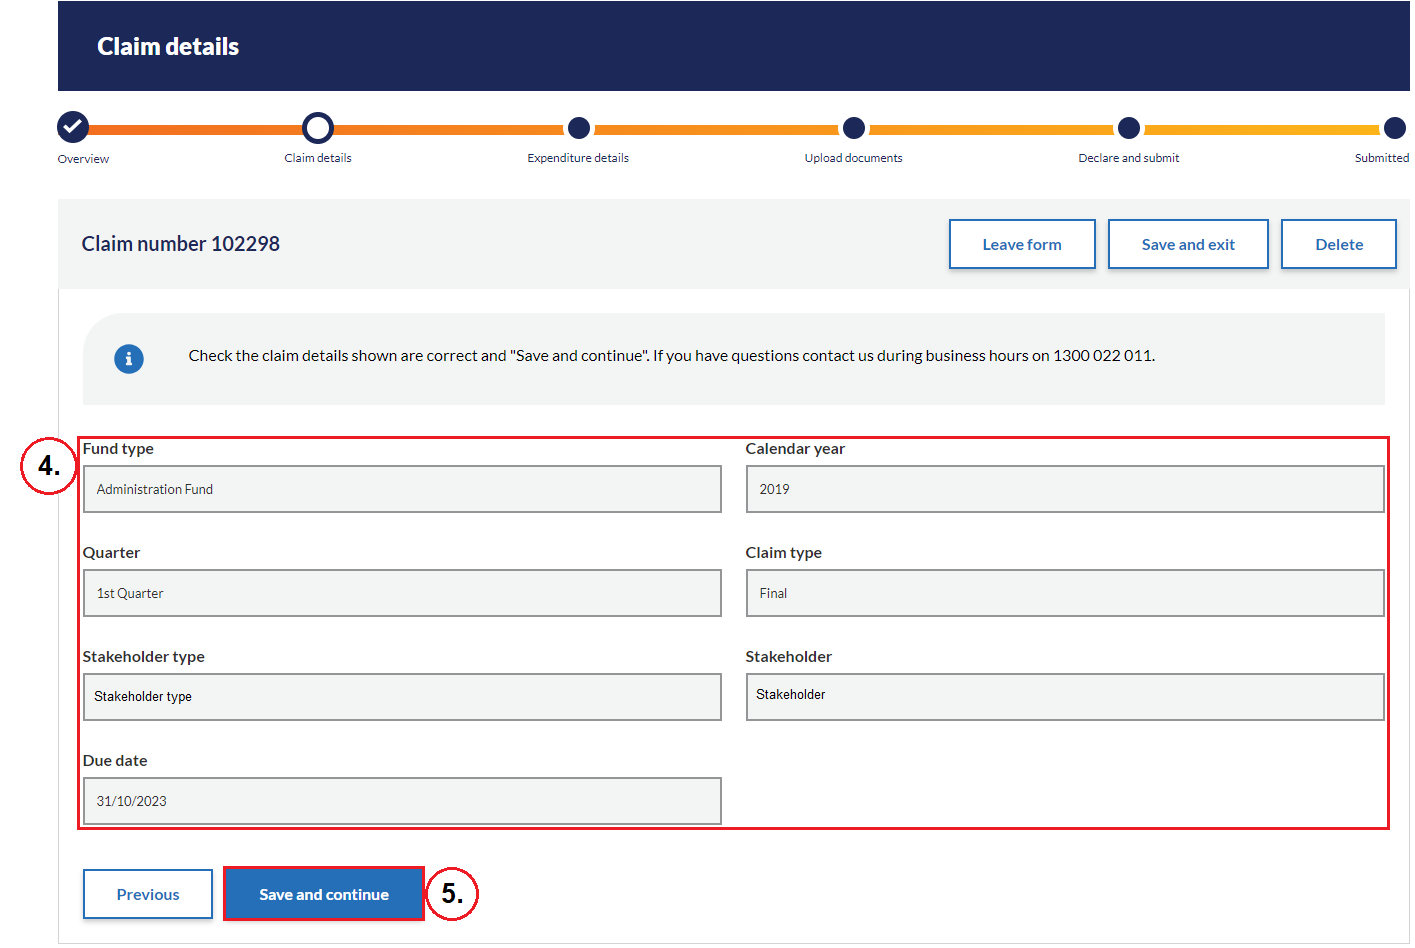
Figure 2: Claim details page for the Administration Fund advance claim form
Declare and submit page
6. Check that the details in the declaration statement are correct.
7. Read the declarations below and tick off each one to confirm your understanding.
- Note: there are different declarations and statements for political parties and elected members.
8. Click ‘Submit’ to submit the claim form to the NSWEC.
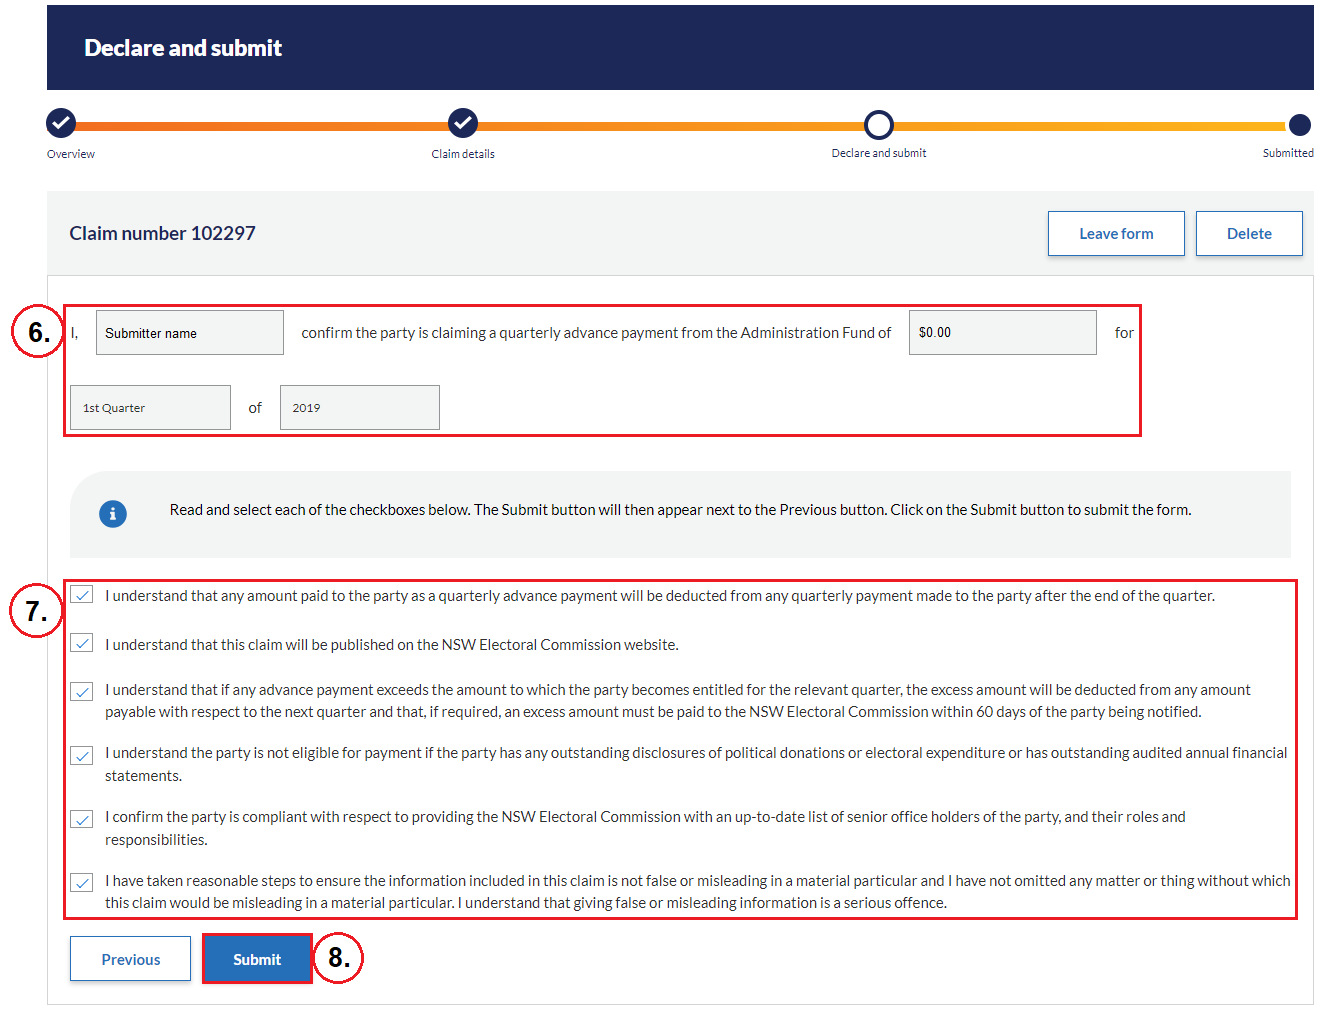
Figure 3: Declare and submit page for the Administration Fund advance claim form
Submitted page
After the claim form has been submitted, you will see the ‘Submitted’ page confirming your submission.
9. Click ‘View form under My Forms’ to go to the ‘My forms’ tab and view the details of the submitted claim form. Refer to the step-by-step instructions for ‘Viewing submitted forms and submitting additional documents’.
10. You can also click ‘Go to home page’ to go to the home page instead.
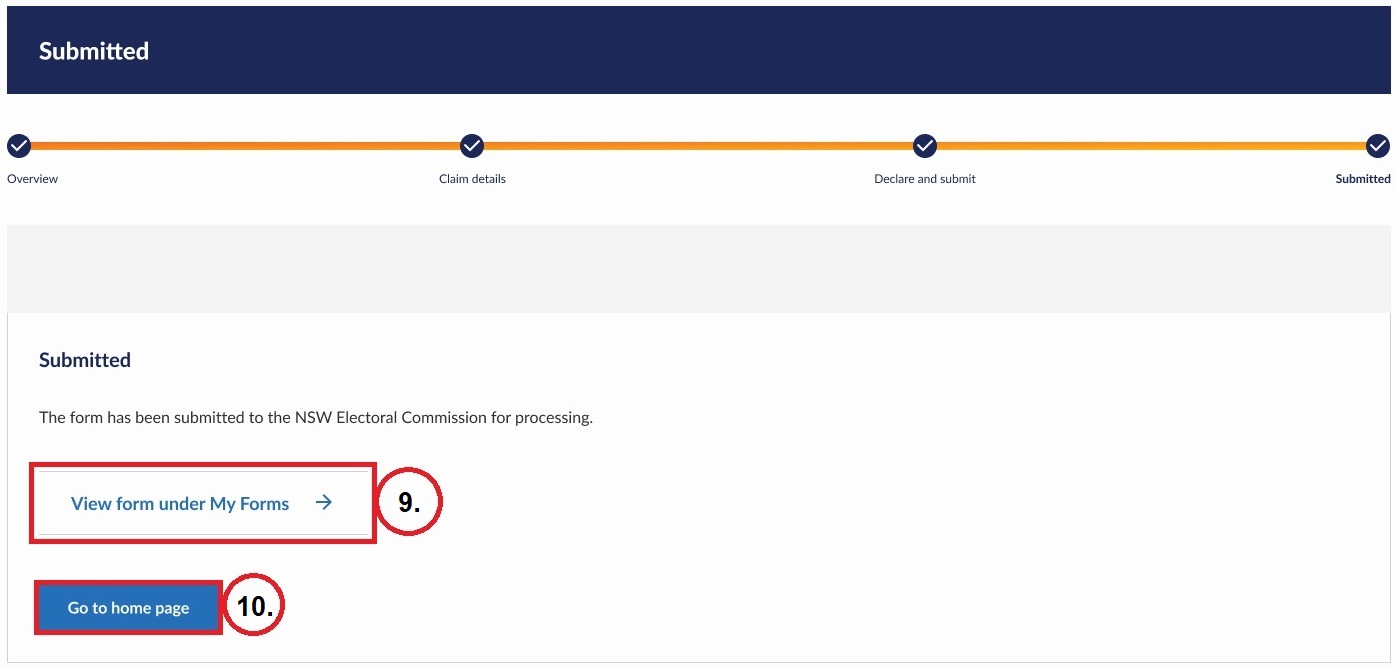
Figure 4: Submitted page for the Administration Fund advance claim form
Preparing and submitting a final claim for the Administration Fund
Overview page
After starting a final claim, you will see the ‘Overview’ page at the beginning of your claim form.
1. Read the information about the claim form on the overview page – including what the claim form is for, who can edit and submit the form, and information about the claim for payment. Note: there is different information for political parties and elected members.
2. To open and read detailed information about what to do for each step, click the arrows next to the next steps. You can also click ‘Expand all’ to open all the steps at once and ‘Collapse all’ to close all the steps at once.
3. Click ‘Save and continue’ to save your progress and go to the next page: Claim details.
- Note: after starting a claim form, if you click the ‘Leave form’ button, your progress will not be saved. If you click ‘Delete’, the claim form will be deleted and reappear under the ‘Start a new claim’ action list.
- Note: if you leave the claim form at any stage, you can access the claim form again via ‘My action list’ on the home page.
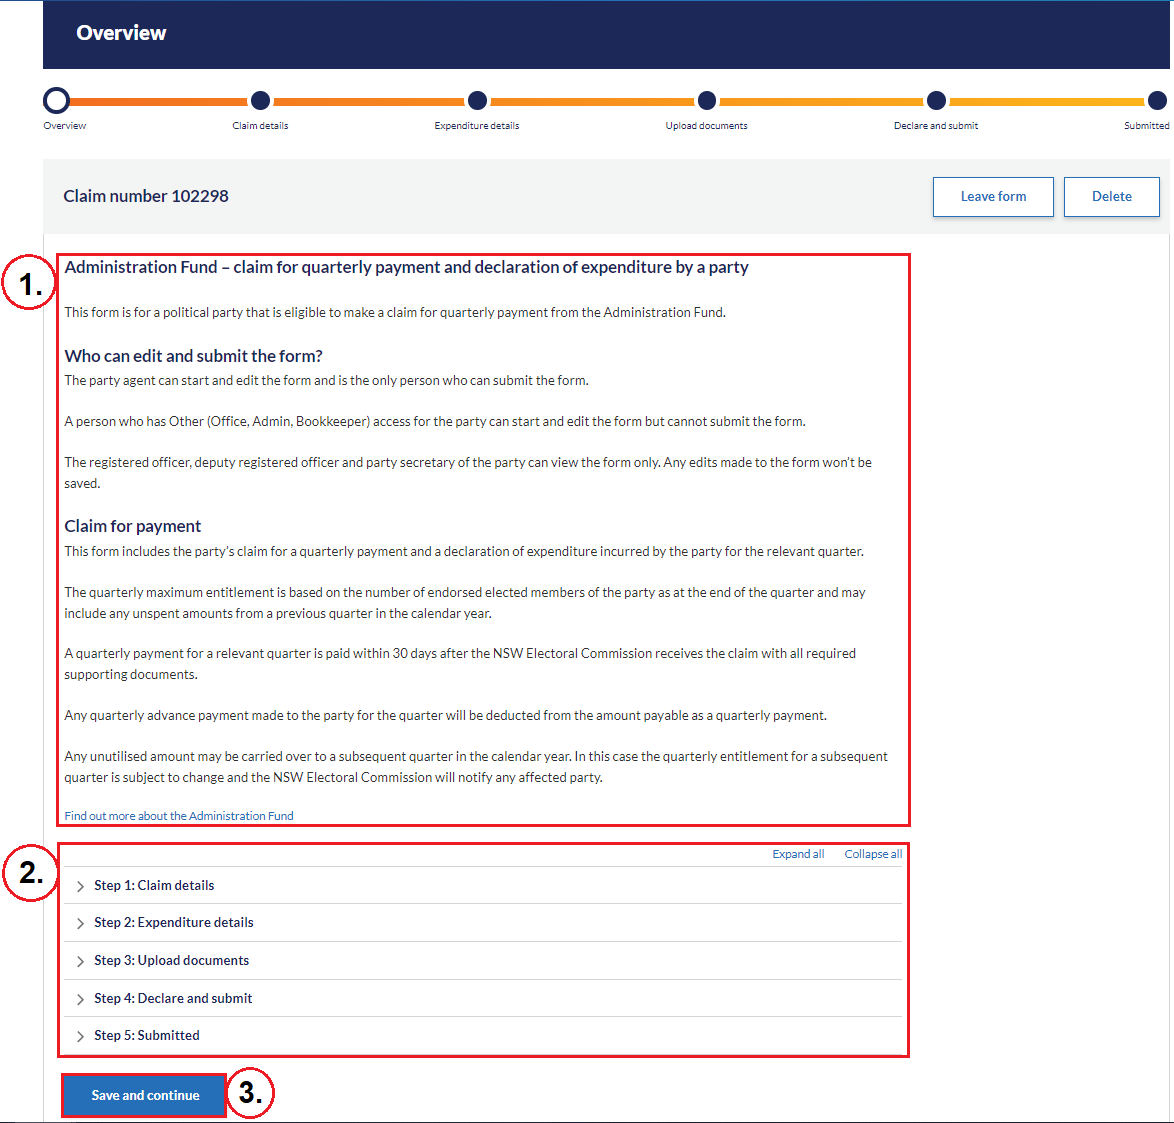
Figure 1: Overview page for the Administration Fund final claim form
Claim details page
4. Ensure the details in the pre-populated fields are correct.
5. Click ‘Save and continue’ to save your progress and go to the next page: Expenditure details.
- Note: to leave the form but save your changes, click ‘Save and exit’. You can also click ‘Leave form’ to discard changes, and ‘Delete’ to delete the form.
Figure 2: Claim details page for the Administration Fund final claim form
Expenditure details page
There are two options to choose from when entering expenditure details ‘Manually’ or via ‘Excel file upload’.
6. Read the information about the step first.
7. Ensure the ‘Maximum entitlement’ is pre-populated correctly.
8. Select how you would like to add your expenditures and follow the steps for whichever selection you choose. Note: the default selection is to enter expenditure details ‘Manually’.
- If you select ‘Manually’, refer to the following instructions under ‘Manual data entry page’.
- If you select ‘Excel file upload’, refer to the following instructions under ‘Excel file upload page’.
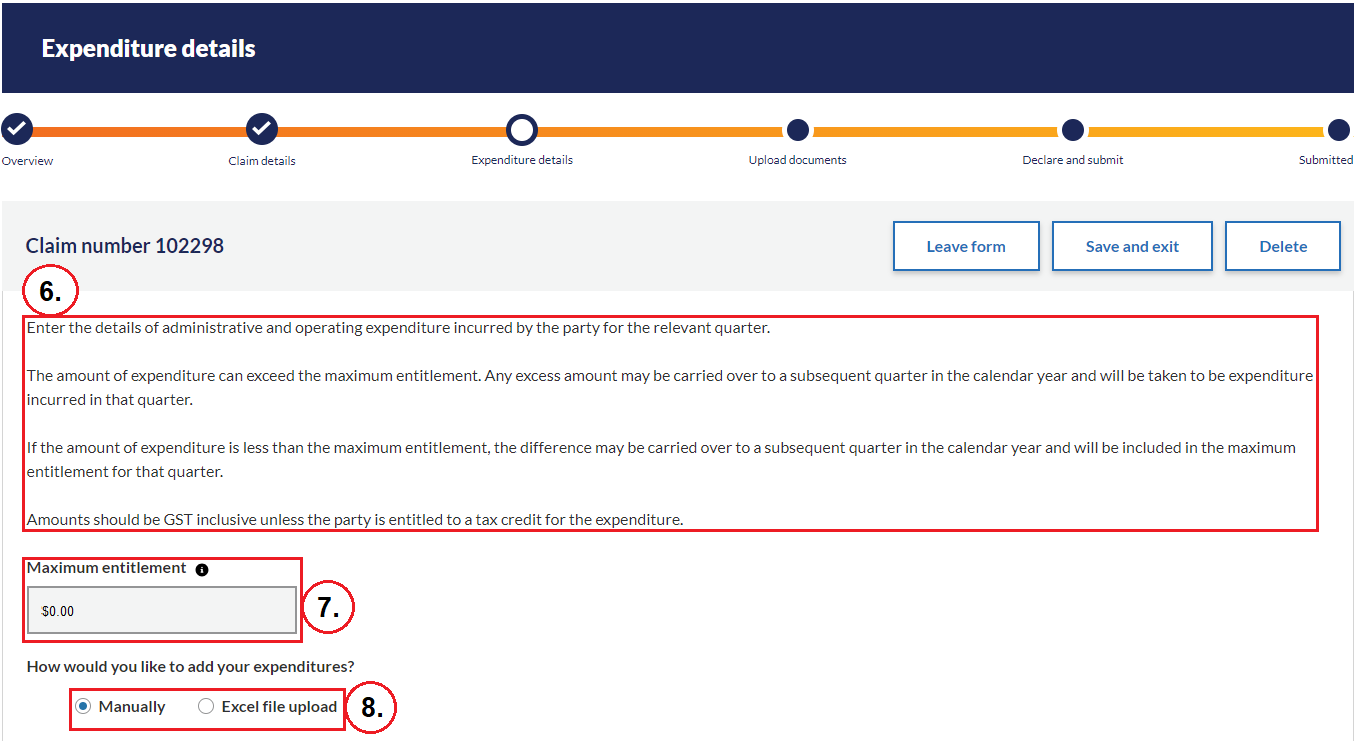
Figure 3.1: Expenditure details page for the Administration Fund final claim form
Manual data entry page
9. The expenditure details are set out under specific categories. Expenditure details should be entered under the appropriate category. For example, if the expenditure is for the administration or management activities, enter the details under Part A: Expenditure for the administration or management of the activities of the party/elected member. To manually enter expenditure details, scroll down and open a section (or part) by clicking the arrow at the end of the section. Note: Part A is open by default and the rest of the part sections on the page need to be opened to enter details.
10. Click ‘+ Add row’ to add a row of expenditure details under a section.
11. Enter details into the fields under the columns for all sections.
12. To delete a row, click the bin icon at the end of the row.
13. Click ‘Save’ to save the row and your progress.
14. Check the ‘Total’ sum of all the rows under each part section to make sure it is correct.
- Repeat steps 9-14, where necessary, under each part section.
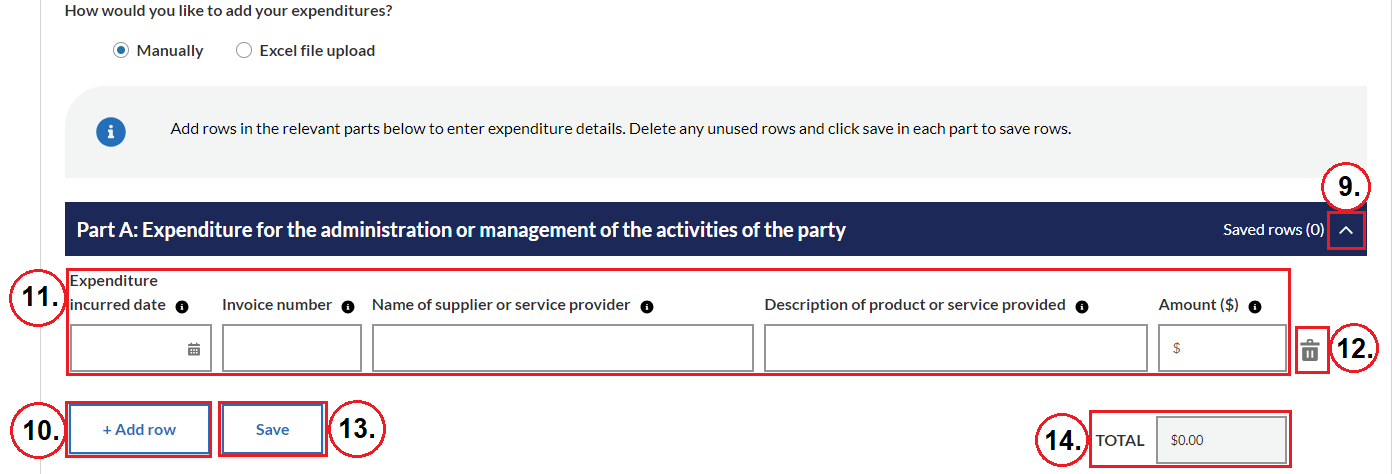
Figure 3.2 Manual data entry on Expenditure details page for the Administration Fund final claim form
15. After entering all of the expenditure details, check the auto-populated details in the fields at the bottom of the page for ‘Total number of saved rows’, ‘Total amount of expenditure’, and ‘Maximum entitlement’. These fields will auto-populate based on your progress.
16. Click ‘Save and continue’ to save your progress and go to the next page: Upload documents.
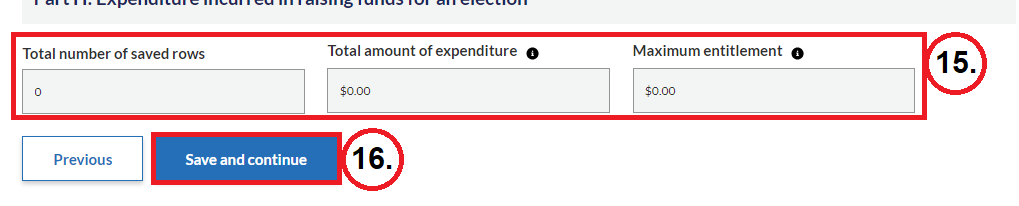
Figure 3.3: Auto-populated details in fields for manual data entry
Excel file upload page
17. If you prefer to enter the expenditure details in an Excel file, select ‘Excel file upload’.
18. Click ‘Download Excel Template’ to download and save the template for providing expenditure details for the claim. If the Excel file has been downloaded before, a pop-up window will notify you. Enter details into the Excel template offline, making sure to follow the structure and the requirements set out for the Excel file.
19. Once you have finished entering the expenditure details into the Excel file, save the Excel file to your local drive and click ‘Upload Files’ or drag and drop the file into the designated space to upload the file. Note: only one Excel file can be uploaded on the page. If you make a mistake on the Excel file, you can delete the uploaded file, update the content, and upload it again.
- Note: you may need to log back into Funding and disclosure online. Go to the Public funding tab on your ‘My action list’ on the home page, and select the ‘Claims started’ sub-tab to reopen the claim form. Check that you are on the Expenditure details page.
20. Click ‘Save and continue’ to save your progress and go to the next page: Upload documents.
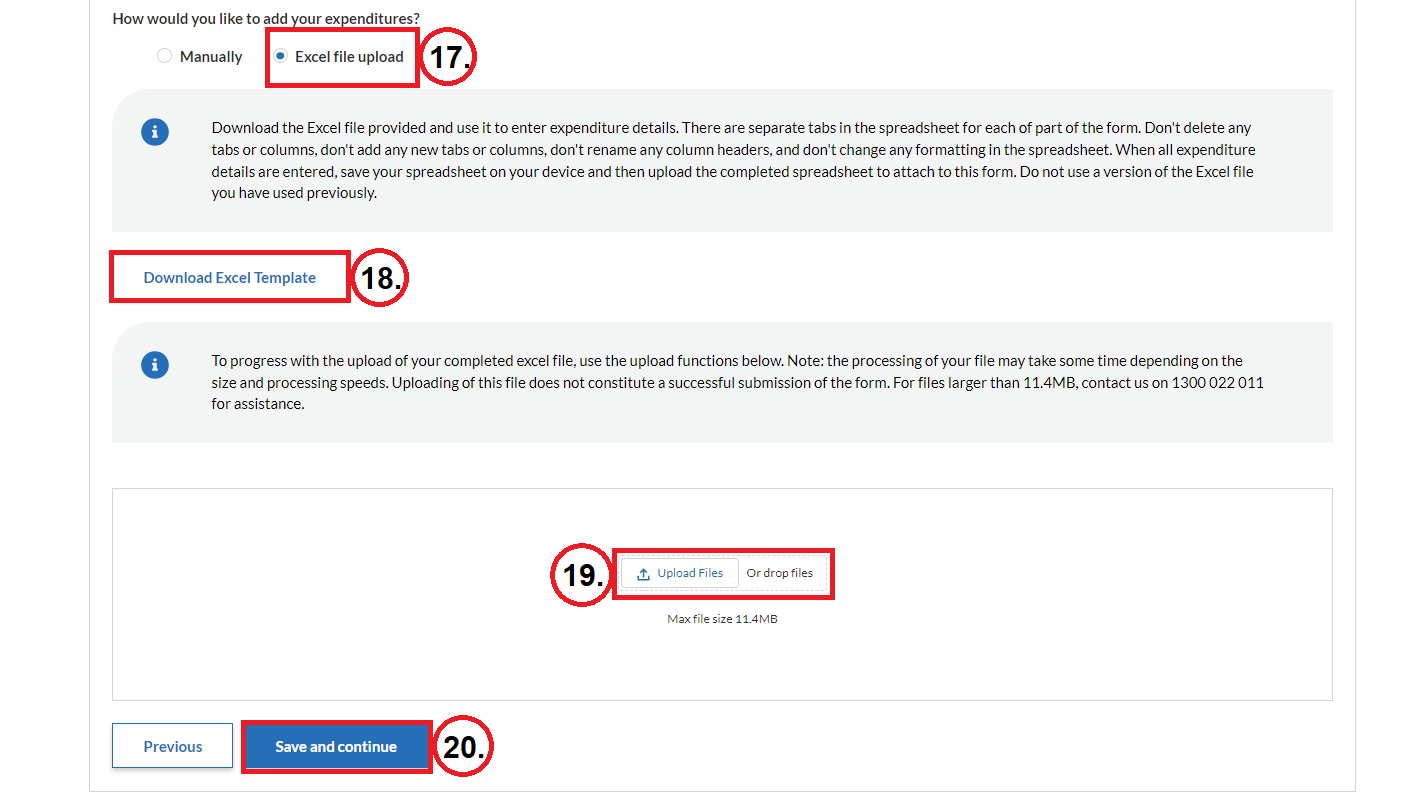
Figure 3.4: Excel file upload for Expenditure details page for the Administration Fund final claim form
Upload documents page
21. Read the information about the requirements for documents that must be uploaded and submitted with the claim. Make sure to follow the recommended file name format when saving documents you intend to upload. This will make it easier for us to process your claim once submitted.
22. Click ‘Upload Files’ or drag and drop files into the designated space to upload the relevant documents. Note: multiple documents can be uploaded on this page.
23. To delete an uploaded document from the table of uploaded documents, click the bin icon at the end of the row that contains the document you want to delete.
24. Once you have uploaded all required files, click ‘Save and continue’ to save your progress and go to the next page: Declare and submit.
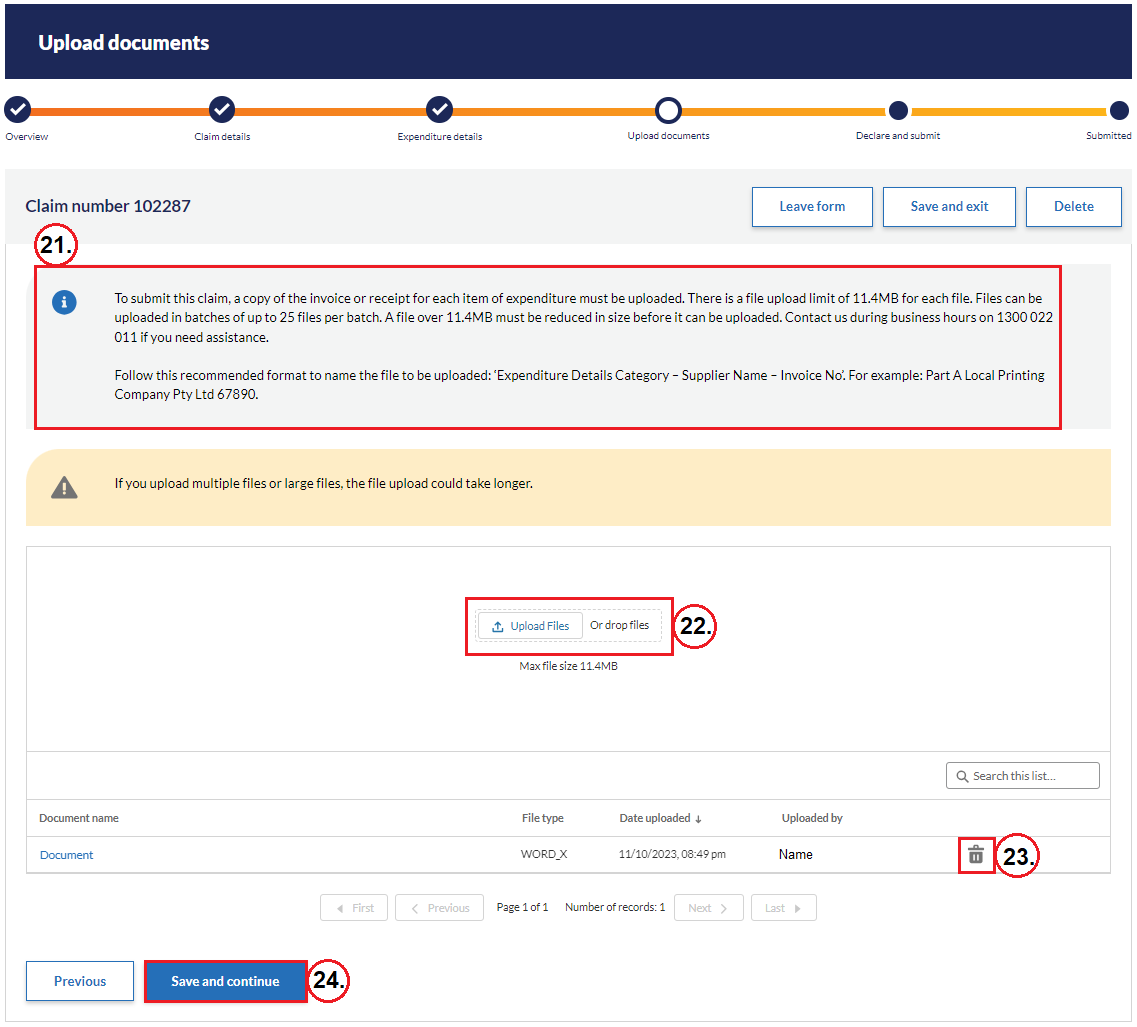
Figure 4: Upload documents page for the Administration Fund final claim form
Declare and submit page
25. Check that the details in the declaration statement are correct.
26. Read the declarations below and tick off each one to confirm your understanding.
- Note: there are different declarations and statements for political parties and elected members.
27. Click ‘Submit’ to submit the claim form to the NSWEC.
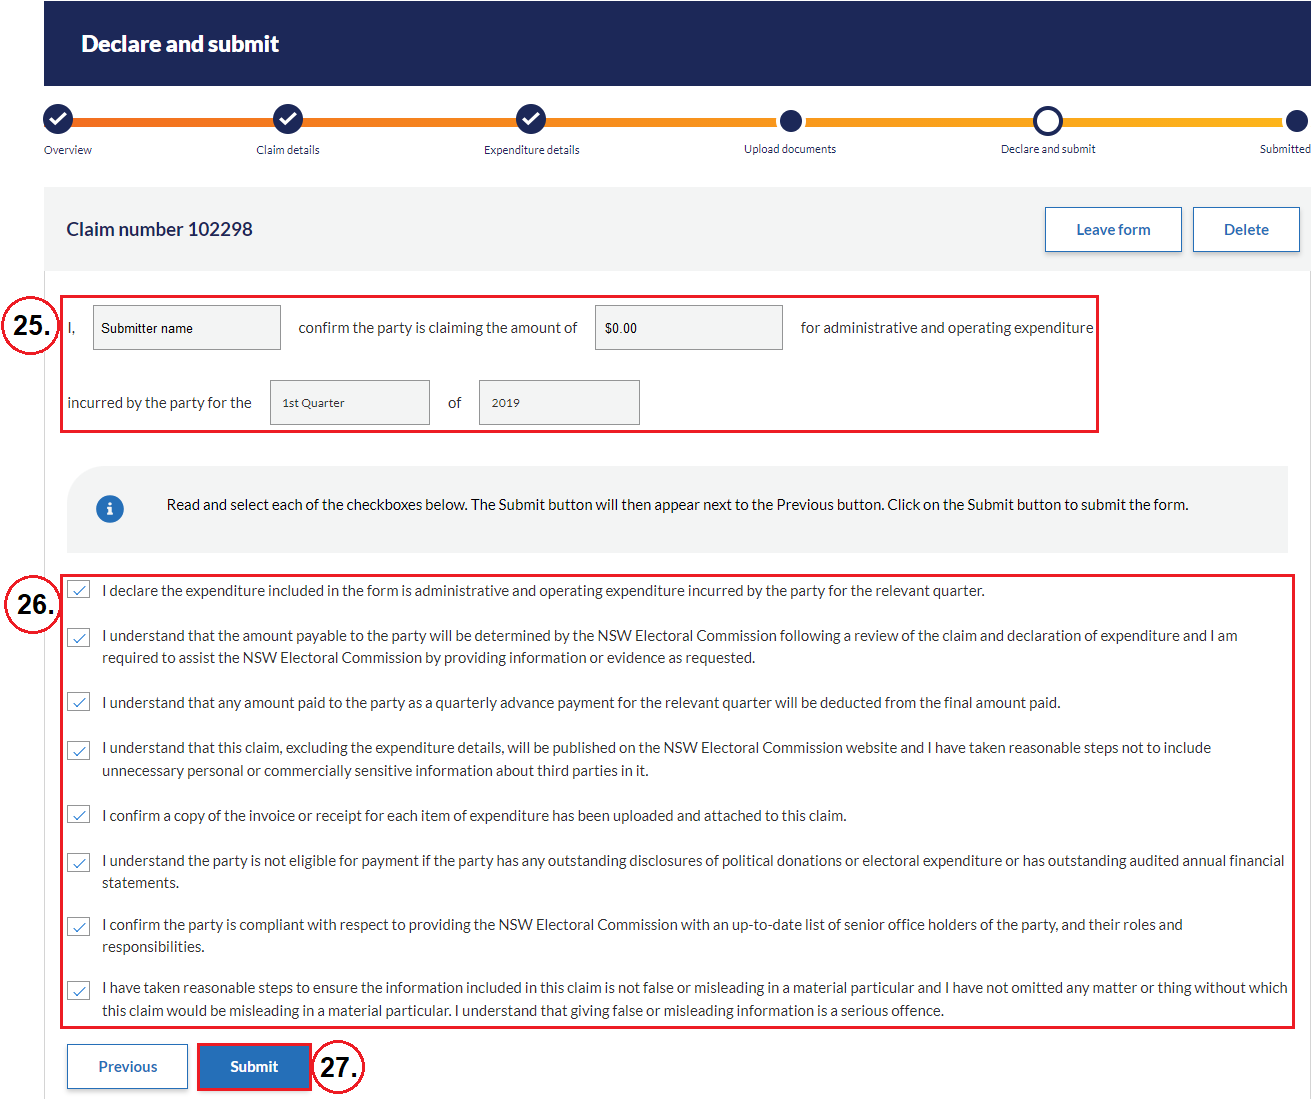
Figure 5: Declare and submit page for the Administration Fund final claim form
Submitted page
After the claim form has been submitted, you will see the ‘Submitted’ page confirming your submission.
28. Click ‘View form under My Forms’ to go to the ‘My forms’ tab and view the details of the submitted claim form. Refer to the step-by-step instructions for ‘Viewing submitted forms and submitting additional documents’.
29. You can also click ‘Go to home page’ to go to the home page instead.

Figure 6: Submitted page for the Administration Fund final claim form